Áron Gerencsér (@_pohaturon) explores the new LEGO® Ideas set, 21331 Sonic the Hedgehog™ Green Hill Zone. Buying this set? Consider using our affiliate links, New Elementary may get a commission: USA LEGO Shop | Australia LEGO Shop | UK LEGO Shop/for Europe 'Change region'. Products in this article were provided by LEGO; the author's opinions are their own.
Having a LEGO® Ideas submission hit 10,000 supporters is an exciting prospect for any builder hoping to see their design show up on store shelves. When the review period rolls around, that excitement can get mixed with anticipation and anxiety - so imagine having the submission held back “for further consideration” multiple times! Thankfully, the “Sonic Mania - Green Hill Zone” submission has now materialized as set 21331 Sonic the Hedgehog™ Green Hill Zone.
Like all Ideas sets, this went through some changes - big and small - during the process of being redesigned from submission into product. Compared to the submission’s ~700 pieces, 21331 got bumped up to 1125 parts coming in at $69.99 / £59.99 / €69.99 / 119.9 AUD / 89.99 CAD. Let’s take a look at the end result and see if 21331 can hit the high score, or whether it ends up losing its rings.
The Parts
21331 doesn’t have any new moulds, as is to be expected for an Ideas set. The head element on the Sonic minifigure is the same mould as the one we got in LEGO Dimensions 71244 Level Pack - Sonic the Hedgehog, but more on that later.
Firstly, I’ll mention that a new 2022 mould that many expected to be present in this set has not been included.
Bigger Ideas sets now receive the 18+ age categorization by default, but here it’s definitely warranted since much of the build consists of painstakingly aligning 1x1 elements: most frequently, two are stacked. This is to achieve the pixelation effect which appears across the model, and the designers put a lot of effort into maintaining an uninterrupted pattern across the entire set - not just one side, as in a 2D video game, but on all sides. This leads to a sort-of-repetition where you need to do the same set of stacks over and over again, but you can’t go in full autopilot since the geometry requires some odd tricks here and there.
So I’m baffled as to why the designers didn’t simply use a recolour of the new 2 plate-tall mould, Plate 1x1x2/3 w/Through Hole (86996), introduced in 2022 Minecraft sets as well as Chinese Traditional Festival sets (see our 80108 Lunar New Year Traditions review by Tom Loftus). This would have cut the parts count roughly in half, and would have made the build process a lot less tedious - just think of not having to align every little 1x1 plate! Why this wasn’t done is quite confusing to me. As mentioned, there has been a long delay in this set’s release; perhaps its design was completed and approved a long time ago and altering this aspect would have created further delays? Any other guesses?Recolours
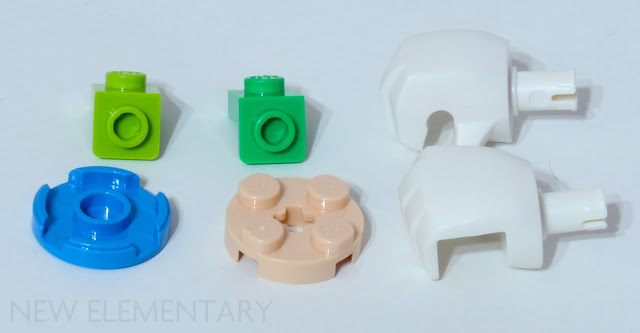
On the flipside, 21331 has plenty of recoloured elements, and some of them come in staggering quantities too.
- Lime Plate 1X1, W/ 1.5 Plate 1X1, Downwards (6384590|36841) x31
- Bright Green Plate 1X1, W/ 1.5 Plate 1X1, Downwards (6384591|36841) x30
- Dark Azure Flat Tile 2X2, Round (6346764|14769) x2
- Light Nougat Plate 2X2 Round (6384589|4032) x1
- White Big Fig Hand left (6384592|10126) x1
- White Big Fig Hand right (6384594|10127) x1
With a combined 61 instances of design 36841 across two colours, this is by far the largest quantity of the mould in a single set. And they're both new colours! We’re not suggesting anyone is going to be buying this set for the parts, but it’s definitely noteworthy.
If you follow the instructions and apply stickers as I did, both the
Dark Azure 2X2 round tiles will be covered by Moto Bug faces.
Prints
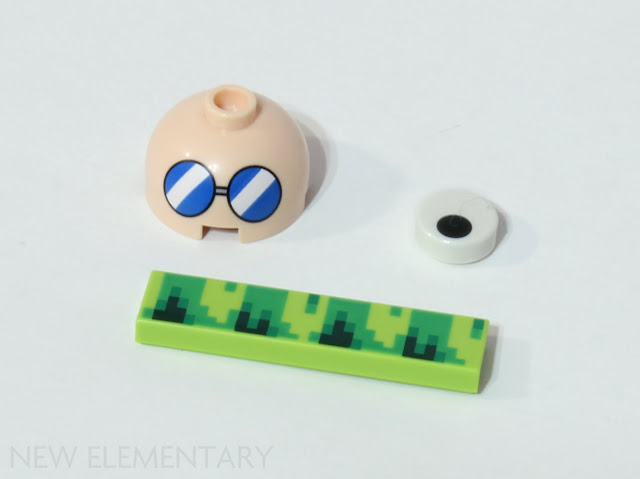
The printed pieces introduced in this set consist of a 1x1 round tile, a 1x4 tile and a 2x2 dome piece. The round tile is used for Crabmeat’s eyes, and seems fairly versatile so I wouldn’t be surprised to see it used again. The 1x4 tile features a pixelated green print that perfectly fits the Green Hill Zone design, but I don’t anticipate seeing it again to be honest. The dome is used for Eggman’s head, and… does not spark joy.
- Light Nougat Dome 2X2, Round with Eggman print (6372161|30367) x1 - notably, the print is at a 45° angle.
- Lime Flat Tile 1X4 with Green Hill Zone print (6372160|2431) x9
- White Flat Tile 1X1, Round with Eye print (6384891|35381) x2
The dome with Eggman’s signature glasses is also new in this colour, so we will hopefully be seeing it without printing in the near future.
Stickers
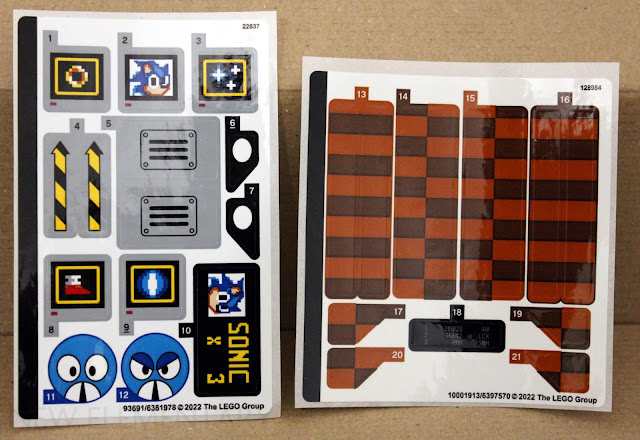
Many of the designs not achieved with bricks themselves in the set are instead achieved with stickers. I often choose to leave stickers off, because my usual interest in sets is the parts for MOC fodder, but this is a very different situation.
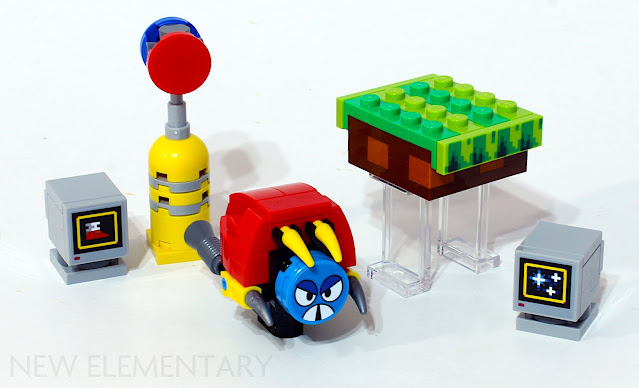
21331 comes with a number of alternate stickers as well, with extras of the corresponding pieces, allowing for some customization of the set’s final appearance. These extras include an alternate expression for the Moto Bug, and different power ups for the terminals. Some stickers are also used to maintain continuity in the pixelated texture that is elsewhere achieved with bricks, on those structures where this would not have been viable otherwise.
The new LEGO Sonic the Hedgehog Minifigure
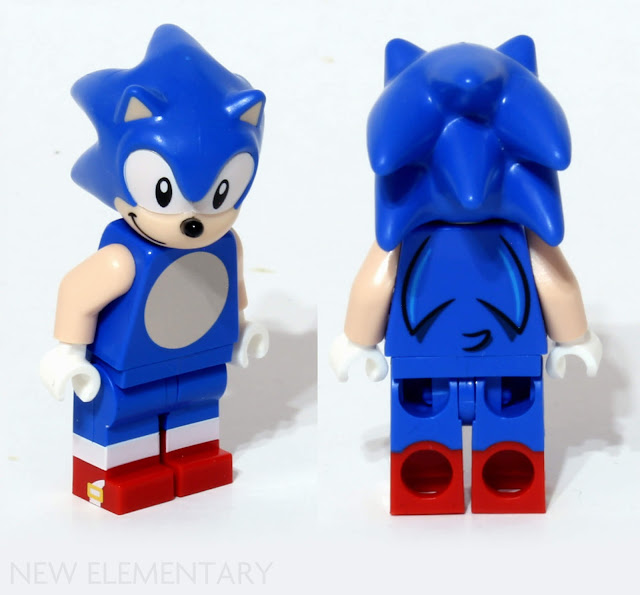
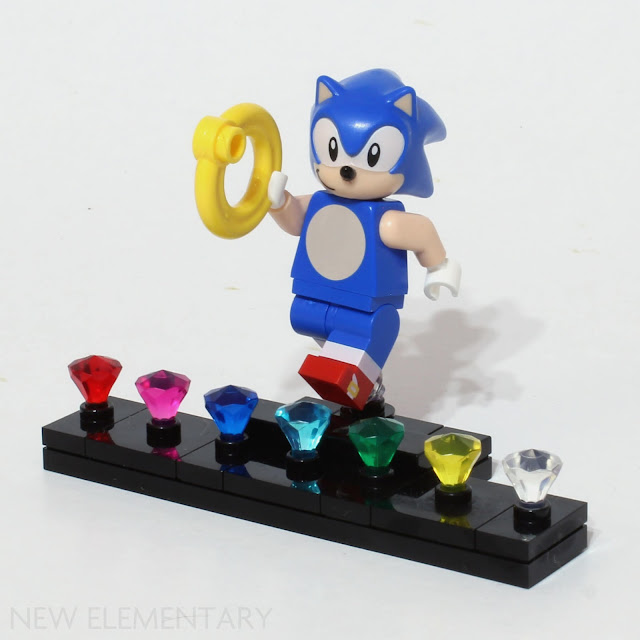
While we mentioned previously how the Sonic minifigure included in this set uses the same head mould as the one from the Dimensions level pack, we’re not dealing with the same minifigure - there are a number of differences.
Staying with the head, there are print differences here - the eyes are entirely black, and the smirking mouth is on the other side of Sonic’s face. On the torso, the light nougat belly is now a round print unlike the oval found on the previous version, and the print on the torso’s back with Sonic’s little tail and a pair of quills is more intricate.
 |
| ©2016 The LEGO Group |
The previous version featured dual-molded legs in blue and white, with red printing. This time around, the leg piece is again dual-molded, but in blue and red this time around, with white printing for the socks and additional printing on the side. The arms this time around are light nougat, like Sonic’s snout. The white hands return.
Overall, I feel like this minifigure is an upgrade over the one found in the Dimensions set - unfortunately, I don’t have it for a direct comparison.
Instructions
When I saw the 1125 piece part count I was surprised, since the size of the set didn’t really line up with what we’ve seen in the past from 1000+ piece sets - of course, even the box art makes it pretty clear where all those parts go, but when you get building it becomes painfully clear.
Before tearing into the build itself, we have the instruction booklet with a front cover based on the start screen of the 1991 Sonic the Hedgehog game, and a back cover with the iconic “end” caption being stomped by Dr. Robotnik. As per usual Ideas tradition, the instructions begin with a short introduction, some information on the source material - presented here as a timeline of the Sonic franchise - and messages from the fan designer and TLG set designers.
The ‘progress bar’ graphics are back again to indicate how far along you are in the build, this time showing Sonic running along. A cute Easter egg is that whenever you finish building a badnik, the little graphic shows him losing his rings.
The Build
We start the build with a neat little stand for Sonic, with a row of jumper plates in front that get populated with Chaos Emeralds as we progress.
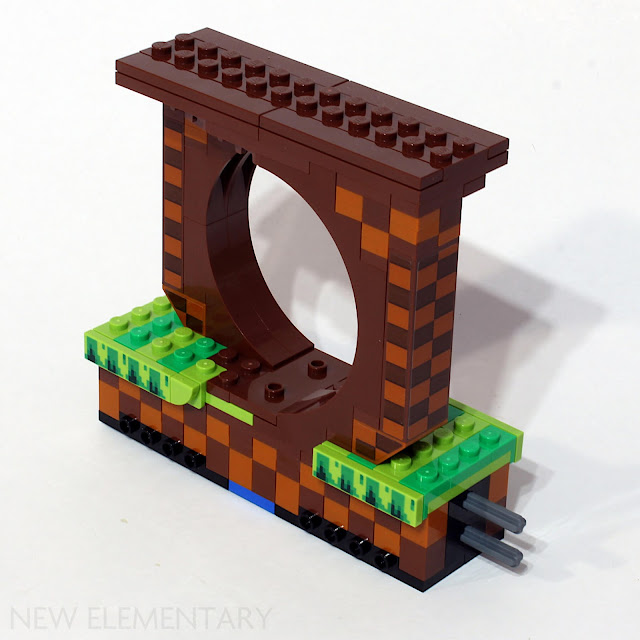
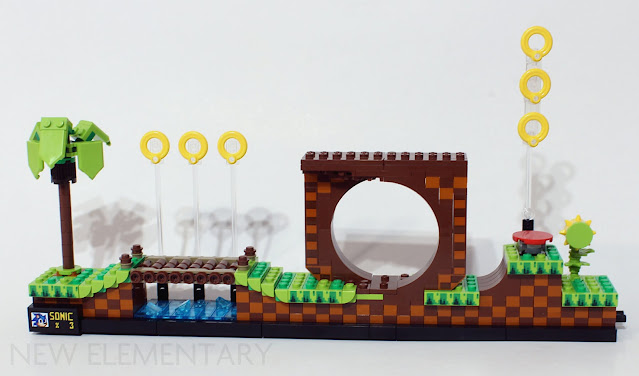
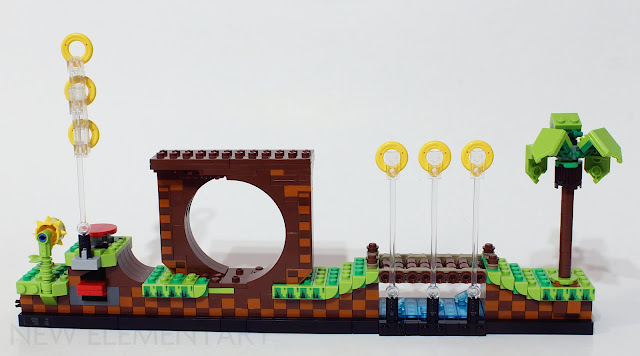
The build consists of four modules for the Green Hill Zone track, and an additional bag for Eggman’s pod. As mentioned before, the repeating pixelated pattern is achieved mostly with stacks of two 1x1 plates, which you need to align well for the best final result. My fingertips weep.
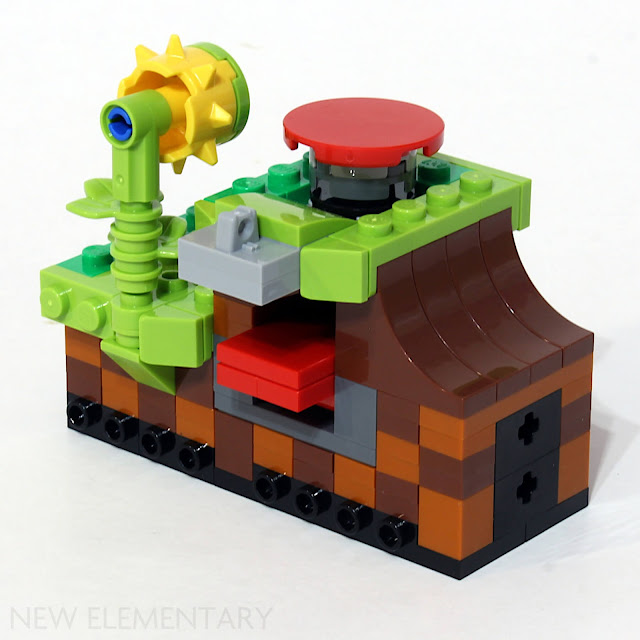
First, we build the initial, small module with a 4x4 footprint that is home to the palm tree. It’s become something of an ongoing tradition to utilize the colourful interior structural builds of sets aimed at an older audience to hide Easter eggs, and in the case of 21331, these colourful interiors are all blue, white and red, mimicking the colour scheme of our speedy hedgehog. We also construct the first badnik, Crabmeat.
The second module consists of two inclines, a bridge and water beneath. As connectors here, we have Technic axles on one side and axle holes on the other; the palm tree module had a pair of Technic pin holes on one side and axles on the other.
Thirdly, we have the iconic loop structure. To maintain an uninterrupted pixel pattern, some stickers are used here - and you need to be really careful to follow the instructions regarding which goes where, otherwise the pattern will be out of sync.
Bag 4 gives us the last module with the Spring and flower, as well as the Moto Bug badnik. Here, the end of the module has two Technic pins jutting out. The spring is functional, with a very simple mechanism used to operate it.
Bag 5 fills out the model with the rings, the Lamppost checkpoint, the power-up terminals and a floating island above the loop. We also have some black tiles elegantly strengthening the structure along the bottom on both sides.
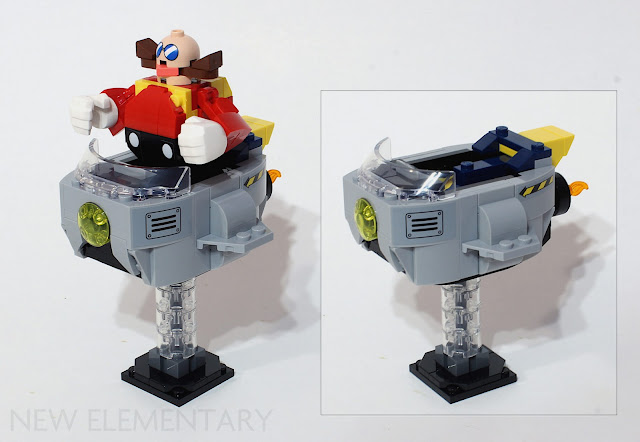
Bag 6 gives us Ivo Robotnik and his Eggmobile which we fight at the end of Green Hill Zone in the original game - here lacking a huge wrecking ball and chain. Like the main track, both of these builds are really dense using a lot of relatively small parts. Due to Eggman’s 3 module-wide body, there’s some jumper plate shenanigans happening in the Eggmobile which is built around a mostly 4 module-wide frame. We finish the model by putting together a little stand for the Eggmobile to sit atop, and ceremonially add the final Chaos Emerald to the stand.
The Finished Model
The original Ideas submission was styled more after Sonic Mania, a modern title in the franchise, which was most apparent in the choice of characters and enemies appearing alongside the mandatory Sonic and Eggman rep.
The greatest and most apparent casualty of the switch to being based on 1991’s Sonic the Hedgehog was Eggman’s large mech (confusingly, still mentioned in the official press release, alongside other references to the submission rather than the set). As a fan of Constraction, I’m sad to see it and its yellow CCBS shoulders get axed. The submission also offers a broader selection of characters, however the track modules themselves are smaller and less part-dense. Overall, the submission feels like a very active set with plenty of opportunity for play, which is something I admittedly miss from the set.
Mechless woes aside, let’s look at the set in the form that we ultimately got. Cutting the mech and other parts-intensive character builds while bumping up the piece count gives us a set much more focused on the Green Hill Zone track itself, seemingly designed with display in mind more than play.
The 1x1 plate-heavy construction is painful to get through - this is not an indictment; it causes actual, physical pain - but the end result cannot be argued with. The pixelated pattern scales fantastically and is flawlessly repeated across the entire 3D model. It isn’t just the terrain made with this pattern that is parts-dense - everything features a sort of complexity that you rarely see. The Moto Bug badnik, which did appear in the original submission, is made with quite a lot of parts for its size, and even the power up terminals which are basically just… boxes are made with various plates and tiles and snot pieces and jumpers and whatnot.
Crabmeat, the other badnik included, is almost an exact match for the fan designer’s take on this character, which they showed off in an update on the Ideas page. The lamppost checkpoint has two sides and can be flipped to represent either active or inactive states - it doesn’t do that spinny-spin as per the in-game animation, but in lieu of colour-changing bricks (get on it, LEGO R&D!) I don’t see how that would have worked anyway.
And then there’s Robotnik. Another detailed, parts-dense design that really conveys the characters iconic proportions well, and maintains the set’s consistently high quality throughout… until we reach the head. I may have complained about aligning a million 1x1s, but fingertip pain fades. Robotnik’s head is forever - and it’s not great.
This, I feel, is the most apparent and distinct downgrade in 21331 compared to the fan submission when it comes to elements that appear in both. The quality of the print on the dome is fine, but the choice of parts combined with this build really leaves me scratching my head. The notch in the 2x2 dome for studs, left empty above the pink 1x1 corner tile, is a real illusion breaker. The pink piece is supposed to be Robotnik’s nose, but the gap in the dome makes it look like a mouth or an outstretched tongue with the gap looking like a nose.
Even using a plate instead of a tile, where the stud would be filling said gap, would have been an improvement here I feel - though this would prevent the bar connection adding stability. It’s not enough to dent my overall appreciation of the set, but I definitely wish Eggman would have a better head - going with the design in the submission would have been a great solution.
Conclusion
I don’t keep sets built. Most of my available display space is dominated by other collection hobby items that can’t be taken apart, and my main interest in LEGO is in parts and MOC making. I mention this because context gives weight to what I say next: I’m keeping 21331 built and on display.
Gripes with Eggman’s head aside, this set is a stunner. While I personally would have enjoyed a take that is closer to the submission in terms of playability, this is a fantastic display piece pressing all the right buttons for nostalgia points. The consistent pattern is lovely to behold, if time-consuming to build, and the track section has plenty of iconic hallmarks of the in-game Green Hill Zone. I particularly love the little badniks, and the bonus stickered tiles for the terminals and Moto Bug’s face are welcome additions.
Some kind of hollow inner space to stash the Chaos Emerald stand when not in use would have been a neat addition, since I’ll be displaying 21331 with Sonic on the track rather than the stand itself, making it a bit extraneous, but this really is in the nitpick tier.
The exposed pair of Technic pins on the end of the track and the pin holes on the first module imply you could buy multiples and connect them to form a longer track, and switch around the order in which the other modules follow one another for some customization - toss in extra terminals with the alternate tiles, make some Moto Bugs angry and you have a nice expanded Green Hill Zone display.
Of course, one can’t help but wonder - what if those little pins aren’t meant to connect to duplicates of the Green Hill Zone set, but to a similar Sonic set based on Marble Zone and beyond? Should such a set materialize in the future, keeping up the quality on display here… well, I’ll be clearing some more shelf space.
READ MORE: LEGO® Super Mario 2022: New Parts in Luigi’s Mansion and Seaside Sets
Help New Elementary keep publishing articles like this. Become a Patron!
Massive thanks go to our 'Vibrant Coral' patrons: Rebranded, Chuck Hagenbuch, Joe Fontana, Elspeth De Montes, Megan Lum, Markus Rollbühler, Mevits Bricks, Baixo LMmodels, Andy Price, Anthony Wright, Chris Cook, London AFOLs, Gerald Lasser, Big B Bricks, Dave Schefcik, David and Breda Fennell, Huw Millington, Antonio Serra, Beyond the Brick, Sue Ann Barber & Trevor Clark, and Kevin Gascoigne. Vale Iain Adams, a great supporter of New Elementary.
LEGO® Shop at Home
USA: Save up to 30%. See what's on sale!
UK: Free delivery when you spend £50 or more at LEGO!
Australia:
Discover the latest promotions and offers on LEGO.com
All text and images are © New Elementary unless otherwise attributed.











A tongue-in-cheek comment by Samuel Johnson seems to imply that it would have been tricky to distinguish 1x1 plates, 86996, and 1x1 bricks from a pile of them. For experienced builders with a keen eye, it'll be easy of course, but I can understand it being troublesome for less experienced builders compared to, say, plates or bricks of differing lengths.
ReplyDeleteIt's really cool to see that the set is built in modules that can be rearranged within a single set, even if it means removing the tiles and having to use more force due to the use of axles instead of pins between modules. Buying multiple sets seems to be encouraged, as well.
As someone who has had this LEGO online handle for 20 years, grew up with both LEGO and Sonic the Hedgehog, and turns 30 a week from now, I am so hyped for this set. You'd think, that by reading this review I'd have spoiled myself, but I think of this review as letting me know what to expect when I open the box. To that end it has only boosted my hype even more.
<3 Glad you enjoyed it Daniel – i'm sure there will be many more lovely discoveries when you actually build it!
DeleteDid Lego ever do a Sonic ad where they paraphrased the "Sega Startup Chorus" as "Lego"?
ReplyDeleteThat's something I'd have considered obvious, although that might be that since I'm Swedish I would pronounce both Sega and Lego with a Long E sound as in the startup (whereas in English, it's a sound that doesn't really exist natively, except perhaps as a Scots pronunciation of the ay diphtong in way, or something)...
I.e. the Genesis Startup Chorus...
DeleteHonestly I love the modularity of this. I'm tempted to try coming up with expansions to this and I've barely even PLAYED any Sonic games.
ReplyDeleteThis was me with the Mario sets. Barely played the video games but been having so much fun with the LEGO sets.
DeleteI should add that I usually use a brick separator to place 1x1 plates and bricks, much less fatiguing that way and automatically aligns adjacent pieces as a bonus (you can do this either with two new pieces, or to align a new one relative to one that's already placed). Doesn't work with tiles of course, but tiles are easier anyway. Since I was a kid, 1x1 plates and bricks have always had extremely tight clutch such that as soon as you join one to a stud, that stud immediately leaves indentations in its inner walls. I've seen this with the back of headlight bricks as well. This never happens with 1x1 tiles, and they're much softer.
ReplyDeleteOdd that they used axles between modules, but pins at the outsides. Eliminates some of the possible configurations...
ReplyDeleteCan't wait to buy this sometime this month.
ReplyDeleteim just looking for the instructions page of eggman
ReplyDelete