Products in this article were provided by LEGO®; the author's opinions are their own.
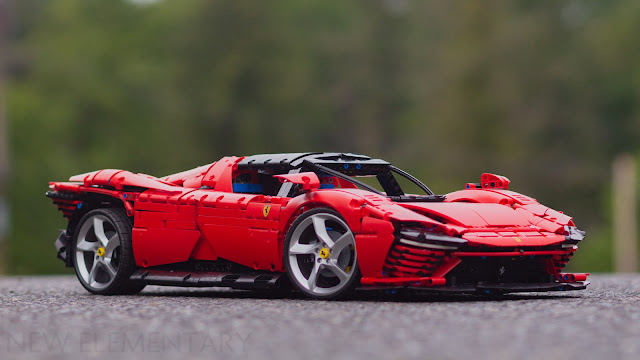
Ferrari's latest exclusive hypercar — the Daytona SP3 — is also the latest LEGO® Technic Ultimate car. 42143 Ferrari Daytona SP3 shares familiar functions with earlier Ultimate 1:8-scale Technic cars while also bringing its own unique styling and technical construction. This majestic Maranello machine sets itself apart with immaculate attention to detail, masterful building techniques, and the excitement of a modern Ferarri hearkening back to the automaker's racing history.
This set review is the second look New Elementary takes at this biggest-ever Technic car following a detailed
look at our favourite parts from this 3778-piece set. This set is on sale now since 1 June for £349.99 / US$399.99 / CA$499.99 / 399.99€ / AU$659.99. Adding this supercar to your garage? Consider using our affiliate links if you're buying from LEGO.com; New Elementary may get a commission:
USA LEGO Shop |
Australia LEGO Shop |
UK LEGO Shop/for Europe 'Change region'.
For our thoughts on the Daytona SP3's features, build techniques, and finished model, read on.
First Impressions
Given this set is a top-of-the-line model based on a top-of-the-line luxury sports car, The LEGO Group's Design Innovation department has wrapped 42143 Ferrari Daytona SP3 in a suitably elegant box.

A unique size sets the Technic supercar box apart from other packaging and as expected, it's heavy from the nearly 4000 pieces and two instruction books. Sliding the lid up and off reveals an alternate view of the LEGO set and a photo of the real Ferrari. The surfaces are finished with a mix of gloss and matte textures which are echoed in the slipcase cover of the limited-run accompanying book,
The Sense of Perfection. Both the set box and the book cover feature mixed-texture racing stripes subtly mimicking Technic liftarms.
Laid on its side here the outer box reveals three separate "Build Boxes" with red stripes, black carbon fibre, and silver rectangles. These are the real car's ribbed rear bumper and exhaust pipes and slight angular bends in the cardboard corners are reminiscent of the Ferrari's bodywork.
The third build box showcases the custom wheels in matching metallic cardboard inserts.
The build
The complex eight-speed transmission sits at the core of the build. "Gearbox" is an apt term here as three stacked 11 x 15 Technic frames make an open box for a gaggle of gears to gather in. The transmission is divided into two halves with a sparser two-speed first stage on the car's right side and a bulkier four-speed portion on the driver's side. As mentioned on the UCS-style info plaque included, a real Ferrari Daytona SP3 has only seven gears. At least in this aspect, LEGO builders are getting more car for their money than Ferrari's customers dropping over $2 million for the full-size thing.
The combined eight-speed gearbox is functionally identical to that found in the last Technic Ultimate car, 42115 Lamborghini Sián FKP 37, and uses orange "wave" rotary changeover catches (35188)
introduced in Technic Ultimate 42083 Bugatti Chiron to shift the gears being utilised. Each click of the paddle shifters is passed on through a Dark Bluish Gray small CV joint (92906) shown at the transmission front, bottom right. "Power" from the engine also enters at the front via the stubby red axle barely visible under the left-most yellow knob gear (49135) and output is sent via the top-most red axle. A long non-geared central axle — yellow at the front and black at back — bisects and bypasses the transmission to transmit power directly from the reverse gear to the rear axle.
There is an error in the manual which will sequence gears in the wrong order. To remedy this, the lime liftarm by the knob gears should be rotated 90° counter-clockwise from what's shown in the instructions and my photo above, as
explained in this article by our fellow reviewers over at RacingBrick. RacingBrick also covers two leftover black panels not used in the instructions, #21 and #22, which ought to be included in the rear diffuser in bag 7.
Built separately from the transmission, the rear axle treats us to the faux coilover shocks and new heavy-duty differential gears covered in New E's parts review. The central Dark Azure 20-tooth gear idles between the top blue differential input gear and the left blue transmission output gear in forward gears; it also connects to the non-geared reverse axle mentioned above.
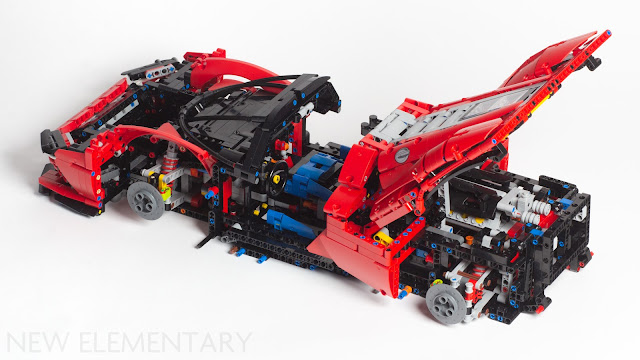
Completing Box 1 gives the satisfaction of seeing every powertrain, steering, and suspension component integrated and laid bare. Like the namesake Daytona International Speedway, torque follows a path bending back and forth. The naturally-aspirated V12 engine's output goes forward, through a "transfer case" between the seats, back through the transmission, and under and into the back of the rear axle — the Daytona SP3 is rear-wheel drive. One of the transfer case's gears peeks through the center console top just behind the red selector for changing from forward to neutral and reverse.
Assembling the body comes in segments as the mechanical portions did. Building up to the exterior of this large set is done with steady progress and strong Technic sections supporting finer angles and details. A number of interesting techniques have been employed to put the final pieces in place.
Best techniques
Early on it's evident special care is taken to use colour-matching pins on the car's exterior. Technic pins are mostly limited to one or two colours for easy identification, like the Technic, Axle 1L with Pin 2L (11214) which comes in Bright Red/ Red or Dark Stone Grey / Dark Bluish Gray. Dozens are included in red which blend with quintessential Ferrari red, but one lone DBG version — pictured left in an orange connector — was thoughtfully included to better blend with the forthcoming black dashboard.
Comma panels (89679), or toilet paper rolls if you prefer, make perfect paddle shifters. The slight curve away from the driver make them easy to grip and rip, a welcome improvement since the left paddle isn't left much room between the steering wheel and the dashboard of the finished model.
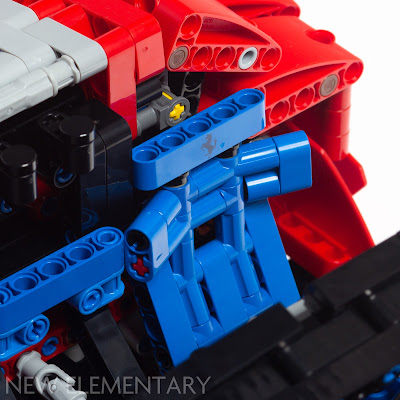
The swan doors have a smart mechanism to swing up and out but I'm amazed by the simplicity of a Technic flexible connector (45590) being used to prop up a new #62 4 x 5 tapered panel (80274). A long brown axle joins connectors to the taper panel and smushes the flex connector a little to hold the door's back edge in place.
Speaking of ways to hold the new 4 x 5 taper panel in place, it's worth noting this part is less than a millimeter too long to fit properly on a straight 5-module length without bending the panel. Its 5L+ edge is designed to fit the hypotenuse of 2 x 5 curved panel but that hasn't stopped designer Uwe Wabra from using it in a 5L space. Instead of a pin, a lightsaber blade is pushed all the way through the attached connector, loosely but sufficiently securing the black taper panels behind the rear wheels.
1:8-scale MOC builders know this one. Using soft axles to hold Technic liftarms, or in this case 2 x 3 quarter ellipses (71708), is a great way to support non-structural and sophisticated curves. Here the rear fender tops rely on 7L soft axles.
A few angled connectors have found themselves supported with a hollow stud where a pin normally goes. The headlight connector sits atop a Technic brick and the bottom of the engine cover vents supports a 1 x 2 jumper by its stud. MOC builders have no doubt experimented with studs in Technic holes but it's rare to see the technique used in an official LEGO set, even in just a couple places. Using several stud to pin hole connections or giving them a heavy load would likely be "illegal" but here's authoritative proof using a couple here and there is A-OK.
The same technique supports each headrest with two 1 x 1 round plates, though these headrests are easier to dislodge. As I feared during my parts review, my sprue-marked headsets give the prancing horse a little blob behind its behind.
Finished model
For car and Technic fans who love a good curvy body, 42143 Ferrari Daytona SP3 has pulled it off. The real car takes design cues from '60s prototype racecars which famously finished in all three podium positions at the 1967 24 Hours of Daytona endurance race. This modern hypercar for the Ferrari loyalists of the 1% outperforms those racecars in every numerical sense, and the Daytona SP3's key numbers are printed onto an Ultimate Collector Series-style plaque in the Technic set.
 |
© 2021 Ferrari S.p.A.
|
The low body, raised fenders, flat rear deck, and capsule-like cockpit are present here just like the 1960s Daytona-winning Ferrari 330 P3, P4, and 412P. With curved Technic panels positioned just so and some spiffy techniques shown above, these swooping lines have been translated flawlessly to create the best-looking Technic car ever.
Printed elements make up the car's plentiful Ferrari badges, instrument cluster and body features like the gas cap and retractable "eyelids" over the headlights.
Pop-up headlights haven't been included on cars since the early 2000s due to pedestrian safety concerns (sharp edges on the people-facing side of a car just wasn't acceptable anymore) but the smooth retracting mechanism of the Daytona SP3's eyes seems to have appeased regulators, for the 599 real SP3s that will be built anyway.
The distinctive ribbed rear bumper is made of regular LEGO plates and tiles and it's one of the largest System segments ever seen on a Technic set. I'm no purist and I love to see detail included in whatever elements best suit it. The engine cover window left me wanting more though, as the real car has rounded corners on that small glass pane. Surely printing on the trans-clear panels would have been possible like the curved corners seen in
the Creator Expert 10295 Porsche 911.

The Daytona SP3's functionality is complete with opening doors and hoods and a removable targa top. A cavernous frunk doesn't come with luggage like previous Ultimate cars (I prefer the UCS info plaque anyway) and the enormous rear decklid opens to show off the V12 engine and those sweet, sweet coilovers.
Opening the engine bay can be tricky. If the rear decklid is lifted from just one side it will flex and there's a separate risk of knocking off a black 2 x 2 plate and two trans-black tiles from the rear bumper. The rear hood can't really be grabbed from the centre either — a balanced two-handed lift is the only way I found to reliably lift it and have it stay in place for a bit. Once it's up, pushing down two secret yellow levers remotely open the sublime, if impractical doors.

The doors and the engine cover all have a tendency to settle back down with gravity, after which each door needs another nudge to line up with the side skirt. The front hood includes a swing-out support to prop the front boot open.
Turning this Ferrari greasy-side up shows off a smooth black belly pan with just the right cutouts to see all the mechanical features do their work. The paddle shifters extend down to an opening in the floor and can be operated with the Daytona SP3 belly-up to watch the eight-speed transmission obey.
Other LEGO Ferraris
Naturally the 3778-piece $399 Technic Ultimate Daytona SP3 must be compared to the other "true" Technic Ferrari, the 1682-piece $169 42125 Ferrari 488 GTE 'AF Corse #51'.
I reviewed the 488 GTE in 2021 and found it to look good with a flexible body and a sufficient array of ordinary features — full suspension, a moving engine, steering, and doors — but thought it could be slightly tough to justify spending $170 for it. For nearly double the price more
should be expected, especially as the $400 Daytona SP3 set edges into ludicrously expensive territory. Size and Ultimate features notwithstanding, the Daytona SP3 is more refined as the entire model is stiffer and the exterior has less noticeable pins of differing colours. No racing dressing means no pattern to break up with panel edges.
No livery is needed to convey Ferrari's racing heritage. 1970 Ferrari 512 M from this year's Speed Champions lineup is based on a car similar to the 1967 24 Hours of Daytona winners and the design influence is evident. High wheel arches, a wide flat back, and visual space behind the rear wheels are seen on both cars.

Conclusion
42143 Ferrari Daytona SP3 packs all the punch of a Technic Ultimate car with an extra level of refinement. After all, a premium experience is to be expected from a £349.99 / US$399.99 / CA$499.99 / 399.99€ / AU$659.99 set. For those who can justify it this could be the Technic Ferrari fans of the Italian carmaker have been waiting for. One critical misprint in the gearbox should be avoided for the most authentic transmission, but otherwise the Daytona SP3 build is an enjoyable ride through a variety of advanced Technic build techniques. Buying this set? Consider using our affiliate links, New Elementary may get a commission:
USA LEGO Shop |
Australia LEGO Shop |
UK LEGO Shop/for Europe 'Change region'.
Editor: Chris Baginski
READ MORE: A walk through LEGO Friends 41704 Main Street Building
Help New Elementary keep publishing articles like this. Become a Patron!
Massive thanks go to our 'Vibrant Coral' patrons: Amy Hays, Chuck Hagenbuch, Joe Fontana, Elspeth De Montes, Megan Lum, Markus Rollbühler, Baixo LMmodels, Andy Price, Anthony Wright, London AFOLs, Gerald Lasser, Big B Bricks, Dave Schefcik, David and Breda Fennell, Huw Millington, Antonio Serra, Beyond the Brick, Sue Ann Barber & Trevor Clark, and Kevin Gascoigne. Vale Iain Adams, a great supporter of New Elementary.
All text and images are © New Elementary unless otherwise attributed.
 A unique size sets the Technic supercar box apart from other packaging and as expected, it's heavy from the nearly 4000 pieces and two instruction books. Sliding the lid up and off reveals an alternate view of the LEGO set and a photo of the real Ferrari. The surfaces are finished with a mix of gloss and matte textures which are echoed in the slipcase cover of the limited-run accompanying book, The Sense of Perfection. Both the set box and the book cover feature mixed-texture racing stripes subtly mimicking Technic liftarms.


Nitpick correction:
ReplyDeleteWhen you're comparing to other sets, looks like you're mixing and matching prices in two different dollars. 42124 Ferrari GTE was US$170, vs the 42123 Ferrari SP3 at US$400. So I'm betting that wherever the 42124 was $300 (Australia? Canada?), the 42123 is gonna be a heck of a lot more than $400.
You are 100% right, I got my prices mixed up. Thank you for pointing that out, I've updated the article to reflect the correction.
DeleteGood review, perhaps too kind. For the price and legotec reputation, one does not expect bad instructions, poor fits, parts not matching their illustrations, cheap-looking plastic, and overall fragility. It is fun to build as its three predecessors, but was not the best effort by its company.
ReplyDeleteThis is my 4th Legotec car build, and IMHO it is way overpriced. My advice is, don't buy it. The illustrations are insufficient detail in many cases; there are errors in the manual; function is poor (the rear deck will not stay open); the plastic panels look cheap; the assemblage is fragile. An embarrassment to Lego.
ReplyDeleteI'll say it: this is a crappy kit, beneath Legotecnic's reputation. I am sorry I bought it. For all the reasons other reviews above gave I would add, it is ugly when finished: chocked with holes for bins, wide joints, and fragile fits. Very disappointing at any price.
ReplyDeleteTo the other commenters I say rubbish. The kit was a delight to build and yes, it is fragile as man LEGO sets are. This isn't a toy, it's a display piece. As for the quality, I think it's exceptional. The gaps in the body panels??? It's a Technic for God's sake!
ReplyDelete