When my allocation of the eclectic mix of LEGO® elements from the New Elementary Skærbæk Fan Weekend workshop arrived through my letterbox, I was immediately inspired by some of the seed parts, and perplexed by others. But I do love a parts fest, so I started by noodling around with a couple of tablescraps, which is usually a good way to get the creative juices flowing. Let's see what happened.
This article contains affiliate links to LEGO.com; we may get a small commission if you purchase.
When is a banana not a banana?
The banana peel element (6464535 |
5215) spoke to me straight away, saying it wanted to get away from being an object of ridicule and transform into something beautiful. So, much like the fairy tale of the ugly duckling turning into a beautiful swan, I gathered some suitable pieces together and fashioned a colourful but slightly droopy flower.
I wanted to use the rubbery whip element in reddish brown (6359864 |
88704) as the stalk, but this presented a bar-to-bar connection conundrum. I soon solved that by using three hollow studs to bridge the gap. This also made something that looks like the covering of a flower bud after it has emerged into bloom – which today I learned is called the
sepal.
Of course, one bloom is never enough. I had plenty of bananas, so I cultivated a whole garden of flowers. And then I decided it needed an inquisitive cartoonish snail to come along and sniff the floral fragrance.
Time for a brew
The next part I experimented with was the Wishbone Suspension Arm (
6464609 | 5294).
I attached three of them at 120° using a Technic Axle and Pin Connector Triple, which I happened to have in black (6460708 | 10288, 49155). This reminded me of a Bunsen burner tripod that we used to use in chemistry lessons, so I added some fire.
The longest central element, Power Burst Bolt Large with Bar Ends (35032b), has a bar which fits nicely into the underside of the Technic half pin I had put into the pinhole in the middle of the assembly, while the bottom pin of the flame fitted into some 1x2 rounded-end plates stacked up as fuel. This provided a surprisingly sturdy connection between the two.
This now reminded me more of a camp fire, so rather than continuing along the chemistry lab route, I thought I would put the kettle on and make a brew! The perfect camping stove emerged, with a mug of hot tea following not long afterwards.
Strutting its stuff
Using the wishbones as a triangular support for the campfire also prompted its potential use as a structural element for a microscale build. So I turned to my favourite "Micropolis standard", and got to work. This use for the part definitely made me think of industrial architecture, so I put together Red Stripe Logistics, the warehouse depot for a firm of tiny couriers.
The cross-axles running parallel to the plane of the wishbone's triangle needed turning through 90° for my intended connection scenario. Fortunately I had the right number of Technic Axle Connector with Axle Hole in black (6331716 |
42135) in my inventory to do what I needed. These then connect to Technic Bricks 1x1 with Axle Hole (6336539 |
73230) in the top of each wall panel via a 2L axle. I could have used the black ones, but I thought the red would pick up the striped accent in the rest of the build.
Assembling the panels with the wishbone's point facing downwards gave enough room either side of the apex to build loading bay doors, with a central column of trans-light blue glass providing some natural light to the interior, framed by the triangular shape of the wishbone.
I'm pleased with how these elements worked to provide the illusion of sturdy struts along the side of the building, I don't think there's any danger of the roof falling in here!
Top-down ideas
I was now on a roll with microscale ideas, and decided to use some of the tan 2x4 triangle flags (6475813 |
5555) as decorative elements for another Micropolis build.
I had recently found a Plate, Modified 8x8 with Cut Corners, Raised Sides and 4 Feet (6318110 |
67929) from in a bulk lot, and thought they were an interesting shape. So I ordered two more with the idea of using them for roof elements – a far cry from their original intended purpose as the base of Bowser's shell in several LEGO® Super Mario™ expansion sets.
The flags were attached to the undersides of these plates with two Plate Round 1x1 with Hollow Stud and Bar on Underside. I discovered I own a mixture of
the long (79194) and short (25893) varieties, so I had to make sure I chose the same ones for each pair I needed.
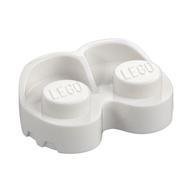
Next, I turned my attention to the top side of the roof. I always like to add plenty of greebles for interest on my rooftops. Eight 2x2 tiles with 1x1 quarter round cutouts provided the bulk of the underlying decor, with a fan-like aircon unit in the middle. I also used some of the white mini-doll shoes (6472137 |
5107) to give extra detail in the middle of each side, capped with 1x1 round tiles in Satin-Trans Clear.
Three of these buildings emerged on a half-block Micropolis base, each with slightly differing heights. I made the main structure using Brick, Round Corner 3x3 Macaroni with 2 Studs (6507853 |
5152) in a concave X arrangement. I was delighted when these appeared in
Trans Clear in the LEGO® Friends
42604 Heartlake City Shopping Mall in January this year (read Eero's
review of set 42604).
I'm also desperate to see a revival of the 2x2 macaroni counterpart in trans-clear – I hope it will happen soon. The original version, without stud notch (3063a), appeared in 1955 and '56, and was then replaced by the version with a stud notch (3063b). That was mainly in use from 1957 to 1978 in several sets, but had its swan song when was used for the Observation Car alternate build in 10022 Santa Fe Cars - Set II (dining, observation, or sleeping car). Consequently, they are very hard to come by, expensive, and often very yellowed if you can find any. It is long overdue for a re-issue! But I digress...
Time for a vacation
If you have studied
Tom's excellent introductory post for this parts fest, you will have seen his tablescrap which resembled roof shingles, made by staggering the stacking of Plate Special 2x3 with Cloud Edge (6513938 |
5518). I came to exactly the same conclusion independently before seeing his article, and this lead me to explore another idea for a microscale model. I don't normally build my creations starting from the roof and working downwards, but it's happened twice in this parts fest now!

The white colour definitely said "snow" to me, so I decided to build a little Swiss chalet nestled somewhere in an Alpine landscape. It has a balcony to lounge on during the summer months, but at this time of year there's obviously a cosy fire roaring inside with the billow of smoke emerging from the chimney. The inhabitants have had a fun time building a snowman in the garden, before retreating indoors to warm themselves by the fire with a hot chocolate or some schnapps. I also threw in a few more of the shoe pieces to add some extra texture to the surroundings.
Search PaB for
part 5518
 Search PaB for
part 5107

Time to fly!
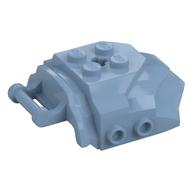
The sand blue Large Figure Cover 4x5x2 with Bar and 4 Studs (6475208 |
4986) suggested the cover for some sort of anti-gravity propulsion engines to me (don't ask me how my mind comes up with these ideas) so I set to work putting a few things together to construct the engines.
I joined two trans-dark pink radar dishes and a wheel hub through the figure cover by using a red lightsaber bar. Another trans-dark pink "lightning" element represents some sort of energy transfer between the black assembly (batteries?) and the rest of the gubbins.
So what did I attach these anti-grav engines to?
They are the propulsion units for this Saunders Duncombe Quad Sedan 500 of course! This lethal-looking machine is a cross between a conventional drone and a mad, flying chair.
It's a lot of fun to use and our intrepid pilot will soon be seen nipping around the skies above a new iteration of the New Hashima collaboration at
Bricktastic in Manchester in 2025. It's a perfect cyberpunk mode of transport.
She's very impressed with the handling of her new ride, but is glad to be back on firm ground so that she can get her breath back. Would you want a go on that thing?!
Final thoughts
Inevitably I have ended up creating a couple of Micropolis builds with some of the parts (it's always wise to play to your strengths) but I also enjoyed making the other models with different parts which I might not normally have in large quantity.
I still have not yet had inspiration strike with what to build from the lovely sand blue dragon wings, or the tan squirrel tails. All the tails make me think of is empty pistachio shells, and then I feel hungry!
READ MORE: Review: 40699 Retro Record Player GwP, available until end Sunday 24 November
Help New Elementary keep publishing articles like this. Become a Patron!
A huge thank you to all our patrons for your support, especially our 'Vibrant Coral' tier: London AFOLs, Antonio Serra, Beyond the Brick,
Huw Millington, Dave Schefcik, David and Breda Fennell, Gerald Lasser, Baixo LMmodels, Sue Ann Barber and Trevor Clark, Markus Rollbühler, Elspeth De Montes, Megan Lum, Andy Price, Chuck Hagenbuch, Jf, Wayne R. Tyler, Daniel Church, Lukas Kurth (StoneWars), Timo Luehnen, Chris Wight, Jonathan Breidert, Brick Owl and our newest top-tier patron, BrickCats! You folks are just the cutest little baby bows.
All text and images are ©2024 New Elementary unless otherwise attributed.
 Search PaB for


In the sixth picture (micropolis) I definately see a frame of a bmx bike in front of the warehouse.
ReplyDeleteMTM